-개발환경-
| IDE : Eclipse 2018-12 (4.10.0) Spring Tool Suite : 3.9.7.RELEASE |
-설정-
|
SPRING 에서 AOP를 사용하기 위해 AOP 라이브러리를 설치해야 한다. 여기선 AOP 라이브러리들중 aspectj를 다루고 내용은 아래와 같다.
pom.xml 파일의 <dependencies> ~ </dependencies> 사이에 아래의 내용을 추가한다. |
-파일구성-
Student.java - 학생VO클래스+핵심메소드 인 클래스
Worker.java - 직장인VO클래스+핵심메소드 인 클래스
Test.java - 외부패키지에 존재하며 , 단순 IntanceMethod 한기 보유한 클래스
LogAOP.java - 공통기능 메소드(before,after,...)를 모아놓은 클래스
applicationCTX.xml - bean객체 , aop태그들을 다루는 파일
MainClass.java
-LogAOP.java-
|
1
2
3
4
5
6
7
8
9
10
11
12
13
14
15
16
17
18
19
20
21
22
23
24
25
26
27
|
public class LogAOP {
public void before() {
System.out.println("LogAOP 클래스의 before() 메소드가 실행됨");
}
public void afterReturning() {
System.out.println("LogAOP 클래스의 afterReturning() 메소드가 실행됨");
}
public void afterThrowing() {
System.out.println("LogAOP 클래스의 afterThrowing() 메소드가 실행됨");
}
public void after() {
System.out.println("LogAOP 클래스의 after() 메소드가 실행됨");
}
public Object around(ProceedingJoinPoint joinPoint) throws Throwable {
System.out.println("LogAOP 클래스의 around() 메소드가 실행됨 - 핵심 기능 실행 전");
long startTime = System.currentTimeMillis();
try {
System.out.println("LogAOP 클래스의 around() 메소드가 실행됨 - 핵심 기능 실행 중");
Object object = joinPoint.proceed();
return object;
}finally {
System.out.println("LogAOP 클래스의 around() 메소드가 실행됨 - 핵심 기능 실행 후");
long endTime=System.currentTimeMillis();
System.out.println("핵심 기능이 실행되는데 걸린 시간 : "+(endTime-startTime)/1000.+"초");
}
}
}
|
cs |
around기능보유한 메소드 작성법 ( 개념은 chewingcandy.tistory.com/80 참고) 은 아래와 같다.
1. around AOP 메소드는 핵심기능이 실행되고 난 후 리턴되는 데이터 타입을 예측할 수 없으므로 반드시 리턴 타입을 Object로 지정해야 한다.
2. around AOP 메소드의 인수로 실행할 핵심 기능(메소드)이 넘어온다. => 반드시 인수로 ProceedingJoinPoint 인터페이스 타입의 변수를 사용한다.
3. around AOP 메소드는 try ~ finally 형태로 실행되며 catch는 throws Throwable로 대체된다.
16 : 핵심 기능이 실행되기 전의 시간을 저장한다
17~20 : try 블록에서 핵심 기능을 실행한다.
19 : ProceedingJoinPoint 인터페이스 객체로 넘어온 핵심 기능을 실행한다.
20 : 핵심 기능을 실행한 결과를 리턴한다.
21~25 : finally 블록 내에서 핵심 기능이 실행되고 난 후 실행할 내용을 코딩한다.
23 : 핵심 기능이 종료되고 난 후 시간을 저장한다.
-applicationCTX.xml-
|
1
2
3
4
5
|
<beans xmlns="http://www.springframework.org/schema/beans"
xmlns:xsi="http://www.w3.org/2001/XMLSchema-instance"
xmlns:aop="http://www.springframework.org/schema/aop"
xsi:schemaLocation="http://www.springframework.org/schema/beans http://www.springframework.org/schema/beans/spring-beans.xsd
http://www.springframework.org/schema/aop http://www.springframework.org/schema/aop/spring-aop-3.2.xsd">
|
cs |
3 : beans 태그에 aop namespace 를 추가해준다.
-applicationCTX.xml-
|
1
2
3
4
5
6
7
8
9
10
11
12
13
14
15
16
17
|
<bean id="logAop" class="com.koreait.springAOP1_xml.LogAOP"/>
<aop:config>
<aop:aspect id="logger" ref="logAop">
<aop:pointcut expression="within(*)" id="beforeMethod"/>
<aop:pointcut expression="within(*)" id="afterReturningMethod"/>
<aop:pointcut expression="within(*)" id="afterThrowingMehod"/>
<aop:pointcut expression="execution(* com.koreait.springAOP1_xml.Student.*())" id="afterMethod"/>
<aop:pointcut expression="execution(* com.koreait.springAOP1_xml.Student.*())" id="aroundMethod"/>
<aop:before method="before" pointcut-ref="beforeMethod"/>
<aop:after-returning method="afterReturning" pointcut-ref="afterReturningMethod"/>
<aop:after-throwing method="afterThrowing" pointcut-ref="afterThrowingMehod"/>
<aop:after method="after" pointcut-ref="afterMethod"/>
<aop:around method="around" pointcut-ref="aroundMethod"/>
</aop:aspect>
</aop:config>
</beans>
|
cs |
1 : AOP 관련 메소드들이 작성된 클래스의 bean을 생성한다.
2 : aop:config 태그 내부에 aop:aspect 태그로 공통 기능 메소드를 정의한다.
3 : id 속성으로 AOP 메소드모음 객체인 bean을 식별한다. 식별만 가능하면 되므로 뭐를 적어도 상관없다.
ref속성에는 AOP메소드모음 객체인 bean을 참조시킨다. bean의 id 속성의 값을 쓴다.
4~8 : AOP가 실제로 시행될 경로를 잡아주고 id를 달아준다.
먼저 , aop:pointcut 태그에서 공통 기능이 적용될 부분(pointcut)을 지정한다.
expression 속성은 within() 또는 execution()을 사용해서 pointcut을 지정한다.
within()은 클래스 단위로 pointcut을 지정하고
execution()은 메소드 단위로 pointcut을 지정한다.
<aop:pointcut>의 id 속성은 pointcut을 식별하기만 하면 되기 때문에 뭐를 적어도 상관없다.
within(*) => 프로젝트의 모든 클래스에 AOP가 적용된다.
within(test.*) => test 패키지의 모든 클래스에 AOP가 적용된다.
within(com.koreait.springAOP1_xml.*) => com.koreait.springAOP1_xml 패키지의 모든 클래스지정
within(com.koreait.springAOP1_xml.Worker) => com.koreait.springAOP1_xml 패키지의 Worker 클래스지정
within(com.koreait.springAOP1_xml.*d*) => com.koreait.springAOP1_xml 패키지의 "d" 를 포함하는 클래스들 지정
d* : d로 시작한다는 의미 , *d : d 로 끝나는 , *d* : d를 포함하는
execution() 은 () 안에 "*"을 먼저 입력하고 1칸 띄운 후 pointcut을 지정한다.
execution(* test.*.*()) => 구조를 볼때 , 패키지이름.클래스이름.메소드이름() 꼴임.
execution(* *.*()) => 프로젝트의 모든 클래스의 모든 메소드.
10~14 : method 속성에는 AOP메소드모음 클래스의 AOP 메소드이름을 적는다.
pointcut-ref 속성에는 <aop:pointcut>태그의 id 값을 써준다.
즉, 예시로 <aop:before>태그에서 수행할 AOP메소드를 결정해주고 ,
<aop:pointcut>태그에서 수행할 경로를 결정해주는 것이다.
10 : 핵심기능 실행전 메소드수행태그
11 : 핵심기능이 정상적으로 종료된 후 메소드수행태그
12 : 핵심 기능 실행중 예외가 발생된 후 메소드수행태그
13 : 핵심 기능이 예외 발생 여부와 관계 없이 종료된 후 수행되는 메소드수행태그
14 : exception 발생 여부와 관계없이 핵심 기능이 실행되기 전과 실행되고 난 후 둘다 수행되는 메소드수행태그
-MainClass.java-
|
1
2
3
4
5
6
7
8
9
10
11
12
13
|
AbstractApplicationContext ctx = new GenericXmlApplicationContext("classpath:applicationCTX.xml");
Student student=ctx.getBean("student", Student.class);
Worker worker=ctx.getBean("worker", Worker.class);
Test test=ctx.getBean("test", Test.class);
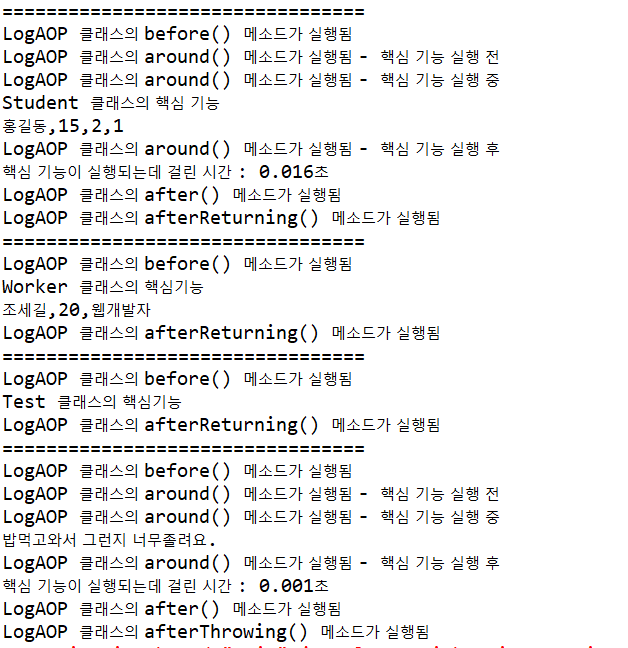
System.out.println("=================================");
student.getStudentInfo();
System.out.println("=================================");
worker.getWorkerInfo();
System.out.println("=================================");
test.test();
System.out.println("=================================");
student.afternoon();
System.out.println("=================================");
|
cs |
1 : 일반적인 AbstractApplicationContext - GenericXmlApplicationContext 방식을 사용하여 bean을 생성하였다.
2~4 : 각각의 객체를 받아온 후.
6~ : 나름 핵심기능이라고 내 스스로 정의한 메소드를 실행시켜보았다.
-요약-
-마침글-
인용
'21년이전 > SPRING' 카테고리의 다른 글
| SPRING - MVC Project 구성하기 및 파일탐색 (0) | 2021.04.29 |
|---|---|
| SPRING - AOP 수행하기 2번째방법 (0) | 2021.04.29 |
| SPRING - 어노테이션java만으로 Properties 적용하기 (0) | 2021.04.28 |
| SPRING - Properties 적용하기 (0) | 2021.04.28 |
| SPRING - xml을 이용하여 Properties 적용하기 (0) | 2021.04.27 |